Wonderful motherhood
Showing posts with label DIY. Show all posts

Thursday, January 23, 2014

DIY : Mini blackboards for my little ones!

Hola mommies (eyh apekes hola pulak nih *_*)


I love to get from Ikea a blackboard for my kids, but after considering the point that not all time they are willing to share, so I cancelled the idea.

But, I tried to find any good alternative. I saw a blackboard vinyls / chalkboard / blackboard wall decal promo but never had intention to buy it.

Till later, I found some ideas of labelling using blackboard vinyl…so I thought this is great (bolehla 2 in 1..untuk anak dan ibu). Lepas tu dh bizi2 lupa pulak nk beli, then tiba2 di suatu hari ternampak Group FB Gojes blogger promo benda ni…apa lagi berdesup terus order dan bayar

Firstly, I thought to stick it to any wall inside the kids’ room. But I read some of the blogger have problem after sticking it to the wall (memandangkan nak cat bilik pun amik masa bertahun baru buat..maka cancel terus idea ni)

While looking for something in the kitchen I found 2 cakes board (haha tau2 la mak2 budget ciput ni suka menyimpan ntah hape2 kunun tuk recycle) Ting! Idea datang!


blackboard vinyls / chalkboard / blackboard wall decal
Cake board (ok xtau apenama…yg penting alas kek birthday)

Step

1. Ukurla blackboard vinyls/ sticker ni, adjust bagi cukup cover cake board (the good thing vinyl / sticker ni ada grid kat belakang..so senangkan keje nk ukur2 ni)

2. Gunting

3. Tampal


4. Siap (haha mcm seminit je boleh siap, pdhal 20 minit jugak untuk satu..so 40 minit tuk buat 2)

Hasilnya..anak boleh conteng, pstu yg bagus moveable (since saiz senang bawak ke hulu ke hilir). Yg tak best depa still gaduh tang kapur (pftt…kapur sapa extra pun gaduh tau…)

Friday, June 14, 2013

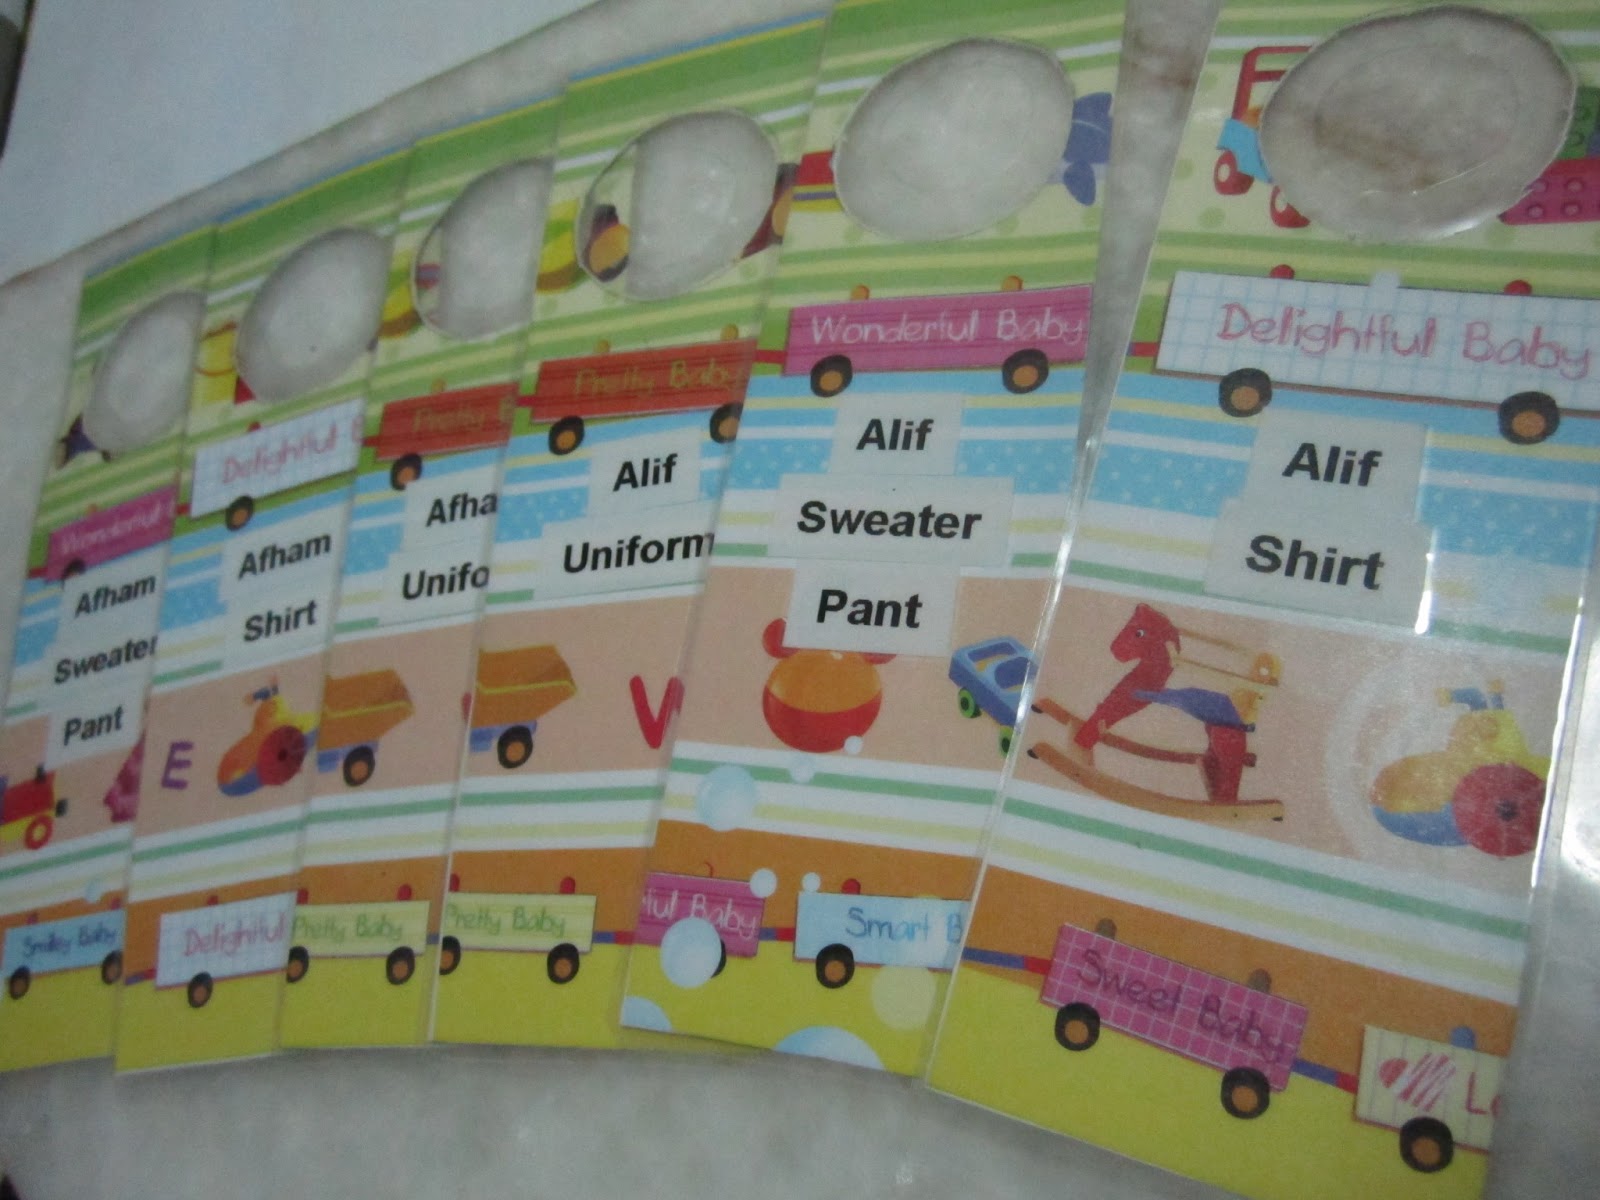
DIY : Kid's wardrobe divider

Remember my last post here?

So here I am sharing some simple step. Perhaps can give you some DIY ideas ^_^

Things you need:-
1. Wrapping paper (pilih ikut sukati..mine beli kat Tesco; berkenan ngan those wording delightful baby, wonderful baby etc)
2. Stationery - Pensil, pembaris, pemadam, gam
3. Kadbod/ kertas keras (or recycle je kotak2 lama)
4. Optional - label maker, laminate


Bahan2 utama ye puan2

Step 1 : Determine the label that you want to do. If you choose to write then can skip this step. Myself know that my handwriting is not consistent. As an option I used the label maker

Step 1


Step 2 : Cut the wrapping paper the the desired size. Then glue it to the cardboard / recycle box

Step 2

Sted 3 : Cut it nicely. Then put the label (or you can write it)

Step 3


Step 4 : Use coin / anything round shape (mine using round sharpener - but make sure la boleh masuk kat wardrobe tu ye). Then cut the circle area. 

Once done you can laminate it (optional)...lupa sbb dh potong bulat dulu sblm laminate maka lps laminate kena potong bulat sekali lg, klu tak cmne nk gantungkan?

Yey..dah siap
That's all..simple step..no such template, because I just make rough estimate.

Monday, May 20, 2013

Organizing kid's wardrobe

For almost 3 years I am using a basket to keep all my boys clothes..Ya just a cheapskate, and maybe during that time no plan for their own room

So everything dumped into the basket, but I will arrange accordingly like baju siang, baju malam, baju jalan etc. (Pls ignore the below arrangement, I just took the picture to show the basket that I use)


Lonngokan baju...ni masa in the midst arranging all their clothes


So when the plan to have kids room, it include the arrangement of their wardrobe. After searching few shops, we managed to grab the one that I like (ok husband tolong drive, ibu yg decide the final product)

So we have the wardrobe that have some space to hang and the rest some drawers. So the plan is to hang those mix and match clothes (which most likely pants and shirt for outing) and the rest daily clothes to be keep inside a Skubb from Ikea

To become a little bit organized, I DIY wardrobe divider, just a simple one (ok no template but I will share later the DIY step)


DIY Divider
How is it turn? I think just nice at least it will be easier with some divider

Spotted the divider?


For the daily wear, I just have some free printable to label the Skubb box. Afham and Alif both will have 3 main box which siang (baju basahan siang), malam (baju basahan malam), jalan (untuk jalan2 but all inside the box adalah baju sepasang yg lebih molek drpd baju basahan siang...since its already have appropriate pair maka xperlula gantung) 


Printable labels


I just use this A4 multi purpose adhesive labels. Bought it from Jusco 10 pieces for RM 3.90. I just print it using the printer at home (no specific setting, just like A4 plain paper printing)


Here the output...just cut it nicely and paste it to the Skubb


The whole view (yg belakang2 dlm Skubb tu xde label sbb rasanya senang nk tau..)


For Alif clothes, I use the same method only that his clothes keep inside the drawer (later will show the whole picture of the wardrobe)


So that's all for the kids wardrobe. Till then

Tuesday, June 2, 2009

Our chapter....gift of love

Sblm ke next2 entry bergmbr..inilah hasil kerja tangan saya yg tidak seberapa..gmbr2 hantaran yg seadanyer....


Nothing fancy2, fresh flower..and considering all the limitations..


Both side deco done by me..except for sirih ~ both sirih family uruskan.....urm...of course ada yg rupa tonggang terbalik since xkan pengantin angkat sume dulang kt masjid kan?

So here the hantarans purple-silver-white and maroon-gold theme


Hantaran for him


sirih


cincin

wallet & belt

perfume set


kasut

shirt & slack


potpouri

tafsir


choc


fruits


cake


Hantaran from him


sirih


mas kahwin


gelang

wang hantaran


handbag


perfume set


shoes


telekung


choc


Monday, May 4, 2009

DIY agin?

Remember the last time that I have showed some steps onn DIY?
Maybe this is the other part but without steps...just series of pics....kot2 la anda boleh guna-pakai idea yg mgkn x canggih mana pun..

bunga penanggah - kosaj istimewa (untk mt gamily) - hiasan 4 pintu kereta pengantin lelaki
~sume adalah recycle lebih2 bahan2 yg ader, so xde pembaziran~


gift meja makan pengantin dan gift box (dalam paper bag special)


diy bilik pengantin versi malas..
since mak andam kata pakej x termasuk bilik tido..
maka beli bunga2 yg dh siap ada lubang..rega bunga tuh RM10....
credit tukang panjat...guru_muda..pengantin mana leh panjat2 takut pe2 kan gitu?

Friday, April 10, 2009

All about DIY that I know

OK..today I would like to share DIY… cara2 deco hantaran..~ of course no fresh flower here since budget, unless you have kebun bunga..wheee

Disclaimer : I’m not professional, but who cares kan? As long ada rupa mirip2 dan nmpk ghupa mcm cantik ok la kan?

I will try to lump everything here..so ini kira kelas DIY deco hantaran, cara2 membuat, step by step, how to do…dan seanggkatan dengannya..

....simple deco hantaran using artificial flower
...bunga dip,
...bunga organza/ bunga tekap ~ sy xtau betul ke bunga tekap tu sama mcm bunga organza ke idak….

Let start our class ~ bukan nk tutup periuk nasi wedding business, but this is meant for pengantin ber-budget like me!

Simple deco


Things you need : ribbons, artificial flowers, pelilit, jaram peniti/ mata lalat, dawai ~ huhu sy xtau no brapa sesuai, i just use ikut selesa ngan tangan

Alatan : tali pengukur, playar ~ gunting pun boleh, janji leh potong

Tips : pandai2la anda mix n match colour, sy rasa anda sume lg terror siap ada chart colour lagik! me? just belek2 kat kedai and suai padankan sesuka hati

Steps:
Tied up 2 diff colours of ribbons with dawai~ pintal2la ikut suka, lagi panjang lagi banyak la pusingan yg anda boleh buat


Tied up the above ribbons to artificial flowers....so make sure dawai tu panjang sket..

Get another ribbon and make sure it is a bit lengthy supaya leh wat pusing2, jurai2...Ikat ~ ikat belasah jelah..ikat kuat2

Sambungkan 2 kuntum bunga ~ guna dawai dan kemas ngan pelilit


Kemas2 kan ~spaya x tercabut pinla guna peniti/ maya lalat..and Tara..sudah siap

Bunga dip
Since I’m little bit lazy, I just put here the link...

http://www.clayalley.com/dihow.htm

Anything that u dun understand can asked here..sbb sy wt bunga telur dip
Note : I think that celup dlm strengthener will takes longer hours untk keringkan..so the solutions just use brush...make it nipis2...

Bunga organza / tekap


Things you need : organza, uhu, dawai bunga stoking, deco – flower staments/ manik2/ daun, pelilit, dawai – untk mengikat semasa mencantum all the petals

Alatan : tali pengukur, playar, gunting, pemidang ~ amat digalakkan, acuan ~ anything..mine botol pencucui specs

Steps :
Potong dawai dan bentukkan ikut acuan ~ make sure have enuff extra lengths as you will need to tie all the petals..sy guna botol pencuci spec

Gamkan organza pada dawai..sila buat cepat2 before uhu itu kering..u might need to practice since takut uhu2 itu nampak x kemas pada kain...encourage to use pemidang...kakak kt kedai sibuk tnya nape beli pemidang? sy jwb adelah...


Tampal sberapa banyak....of course using pemidang lagi senang

Guntingkan organza mengikut bentuk dawai..kemas2kan in case ada yg uhu x melekat kat organza..
Tied up all the petals, u can add deco like manic+daun+flower stamens..anything
Make few petals so that u can combine it all, plus other extra deco like ribbons

Note : Sila bentukkan dawai anda in 1st step since once dh tampal x kan le nk ubah bentuk kelopak

Tara..sudah siap untk diletakkan ats polistrin yg dh siap


So..is it difficult? Tak faham sila la tulis di bahagian komen.....kihkihkih

End of our class...~ so is it ok if i dun put all the hantarans pics since korg dh nmpk deco-nyer?